Images and Multimedia
|
|
Using Images in Survey Shaper - Click here to view a short video demonstrating how to include images in your survey. |
Images
Images can be displayed in a survey, either as an answer or within the question text.
To add an image to a survey:
- Upload the image to the Survey Resources folder:
- Click on Resources

- Click on Upload
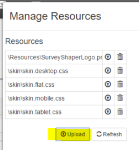
- In the Upload Resources dialog box, make sure the Resources folder is selected as the upload location, and click Upload

- Locate and select the file to be uploaded, then click Open
- The uploaded image will be displayed in the resources list (click Refresh to refresh the list if required). Click on it to preview the file (remove and re-upload if required).
- Close the Manage Resources dialog box.
- Click on Resources
- Add the image reference to the required question.
- Save and preview.
HTML Files
Links to html files can also be placed in a survey.
To add link into a survey:
- Upload the html fileto the Survey Resources folder.
- Click on Resources

- Click on Upload

- In the Upload Resources dialog box, make sure the Resources folder is selected as the upload location, and click Upload

- Locate and select the file to be uploaded, then click Open
- The uploaded file will be displayed in the resources list (click Refresh to refresh the list if required).
- Close the Manage Resources dialog box.
- Click on Resources
- Add the file reference to the required question.
- Select the hyperlink text and click on the Insert/edit link button

- In the Insert link dialog box, select the required file from the Link list drop down. The URL field at the top of the dialog box will automatically update once a link has been selected.
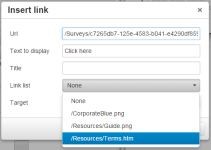
- Select New Window from the Target drop down list. This will ensure that the link will open in a new window, making it easy for the respondent to return to the survey after clicking the link.

- Click OK to close the Insert link dialog box.
- Select the hyperlink text and click on the Insert/edit link button
PDF Files
Currently, a workaround solution is required to place a pdf link in a survey.
To add a pdf file link into a survey:
- Upload the pdf file to the Survey Resources folder.
- Click on Resources

- Click on Upload

- In the Upload Resources dialog box, make sure the Resources folder is selected as the upload location, and click Upload

- Locate and select the file to be uploaded, then click Open
- The uploaded file will be displayed in the resources list (click Refresh to refresh the list if required).
- Select the pdf file name and press CTRL+C, or right mouse-click and select Copy to copy the file name to the clipboard.
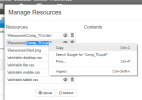
- Close the Manage Resources dialog box.
- Click on Resources
- Add the html reference to the required question.
- Select the hyperlink text and click on the Insert/edit link button

- In the Insert link dialog box, the pdf file will not be visible, so select a file in another format (e.g. jpg, png, htm) from the Link list drop down. The URL field at the top of the dialog box will automatically update once a link has been selected. If there is no file available in the list, you will need to upload an image or html file to the Resources folder, following the instructions above.

- Click on the URL and scroll across to the file name at the end of the URL (after 'Resources/'). Delete the current file name and CTRL+V or right mouse-click and select Paste to paste in the pdf file name at the end of the URL.
- Select New Window from the Target drop down list. This will ensure that the link will open in a new window, making it easy for the respondent to return to the survey after clicking the link.

- Click OK to close the Insert link dialog box.
- Select the hyperlink text and click on the Insert/edit link button
Videos
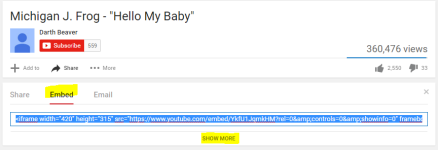
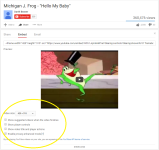
The simplest way to add a video to a survey is to embed a YouTube video.
- In YouTude:
- In Survey Shaper:
- Drag and drop a survey object from the toolbox into the Designer Pane
- In the Question Text property, click on the Source Code button

- Paste the html code copied from the YouTube video into the Source Code editor
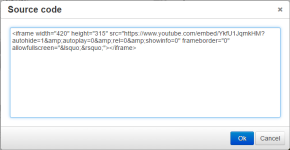
- As required, edit the html code to modify YouTube parameters
- Click OK to close the Source Code editor
- Save and preview.
YouTube Parameters
The display of embedded YouTube videos can be customised using parameters within the <iframe> html tag. The main parameters that can be used for displaying a video in Survey Shaper are listed below.
| Parameter | Value | What it Does |
| autohide | autohide=1 | The video progress bar and player controls display or hide automatically |
| autohide=0 | The video progress bar and player controls are visible throughout the video. | |
| autoplay | autoplay=1 | The video will automatically start to play when the player loads |
| autoplay=0 | The video will not automatically start to play when the player loads | |
| controls | controls=0 | Player controls do not display in the player |
| controls=1 | Player controls will display in the player | |
| modestbranding | modestbranding=0 | Removes YouTube logo overlayed on video |
| rel | rel=0 | Will not show related videos at the end of the video |
| showinfo | showinfo=0 | Will not display information like the video title and uploader before the video starts playing |
| width | width="420" | Specifies the width of the video |
| height | height="315" | Specifies the height of the video |
To use any of the above parameters, enter them into the html code, separating each with an ampersand:
<iframe width="420" height="315" src="https://www.youtube.com/embed/YkfU1JqmkHM?modestbranding=0&autohide=1&rel=0&controls=1&autoplay=0&showinfo=0" frameborder="0" allowfullscreen></iframe>


